In this guide, we will explain how to create a form with repeat group prefill functionality that displays all child records based on a parent record found via the Salesforce lookup field. You will be able to update any of the child records.
The Repeat group will be linked to a master field that will provide the Salesforce master record ID. For example, if the repeat group is listing Contact records the master record will be AccountId. If the repeat group is listing Tasks the master record will be WhatId or WhoId. Additional options will allow you to filter the related records and choose the Formyoula connection that will be used for field prefill.
1. Go to Formyoula.com and click “Sign In”.

2. Click “New Form”.
3. Click “Rename” to give your new form a name.

4. Drag and drop a Salesforce Lookup field from the “Salesforce” section. This will be used to search for existing Account records in Salesforce.

5. Click on the “pencil” icon and edit the Salesforce Lookup field. We will name the field label “Find Account Record” and we will select “Account” from the available “Object” list.

6. Please save and close the form.

7. Please click on the “Actions” button and select the “PDF Editor” option.

8. Please find the Salesforce Lookup and copy the merged field ID.

9. Once copied, please go back to the form builder’s page by clicking on the form’s name.

10. Next, please drag and drop a “Repeat Group” element on your form from the “Select” section. Click on the “pencil” icon and add the necessary fields. Apply the changes when done.
- First, please input the Child Object name.

- Next, please paste in the merged Salesforce lookup field ID in the “Formyoula Parent Field” tab.

- Please input the Salesforce parent object’s API name in the “Salesforce Parent Field” tab.

11. Please drag & drop all the necessary fields for the child record update. Please include Hidden fields for the Record ID and Parent Record ID, this will be used for the existing record update.

12. Please save and close the form.

13. Click on “(Add)” under the “Connections” column or click on the “Create a Connection” button, or select “Add/Edit Connections” from the “Actions” available list.

12. Select “Salesforce” from the available connections list and click “Create Connection >>”.
13. Select “Contact” from the available Salesforce Object list and click “Save”.

14. Next, please select the repeat group section “Contact” under the “Use Repeat Group” section. This will ensure the creation or update of multiple records in Salesforce.

16. Save the record settings when done.

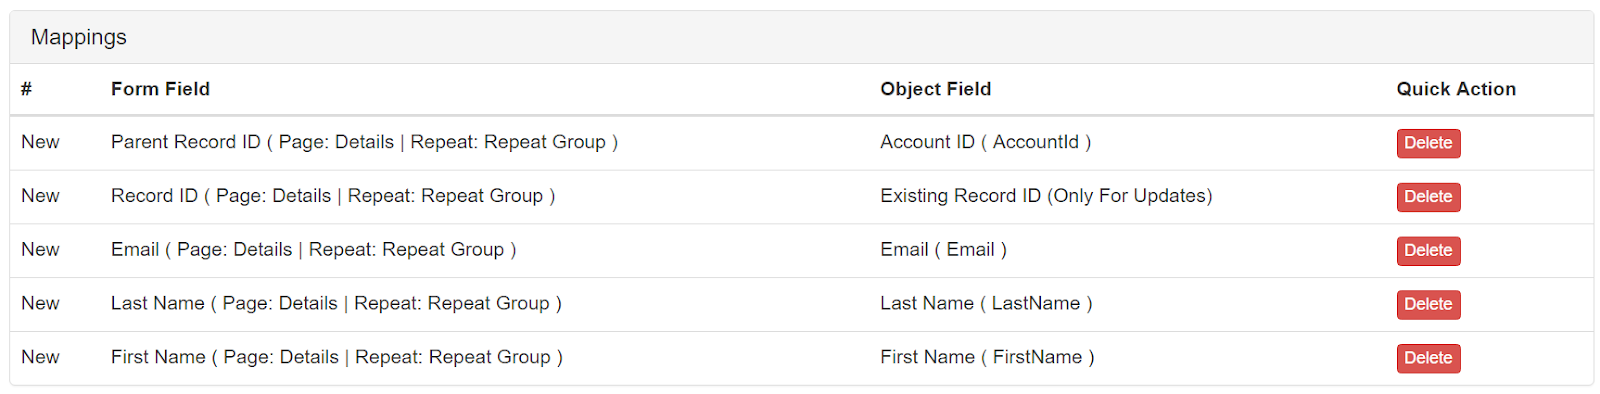
17. Please create all the necessary mappings for the Contact object including the Record ID and Parent Record ID (in this case Account ID) fields.
18. Next, please copy the 24 digit connection ID from the URL.

19. Next, please go back to the form builder and edit the repeat group field. Please paste in the connection ID in the “Autofill Connection” tab. This will be used for the child record prefill.
/w=1920,quality=90,fit=scale-down)
20. Please save and close the form once done.

21. Please click on the blue “Try” button next to the form. This will open the mobile web app.

22. Please select the newly created form.

23. Now, once we find an existing Account record by using the Salesforce Lookup field all the associated Contact child records will be automatically pre-filled in the repeat group sections.
/w=1920,quality=90,fit=scale-down)
For any questions, please email [email protected]